Best Pot and Soil Mix for a Monstera Plant
Choosing the right or best pot and soil mix can make a big difference in growth of Monstera Plant indoors. A best pot always have drainage wholes and a space available for roots expend. A good soil mix has enough moisture for the roots while also allowing air to reach them.
Monstera deliciosa is a type of monstera plant that grows naturally in Central America. As a houseplant it can grow well in a container when its roots have suitable space, moisture, air and support.
What Makes a Good Pot for a Monstera Plant?
The best Monstera pot is not means the largest pot you can find. The container should have to match the size of the plant and its root system. A big size pot can contain more wet soil than the roots can use this can make it harder to judge when the plant needs water or not. Penn State Extension recommends moving a houseplant into a container that is only slightly larger when the current container has become too small. For Monstera deliciosa the University of Minnesota Extension suggests choosing a new container about 2 inches wider than the current one.
1. Choose a Pot With Drainage Holes
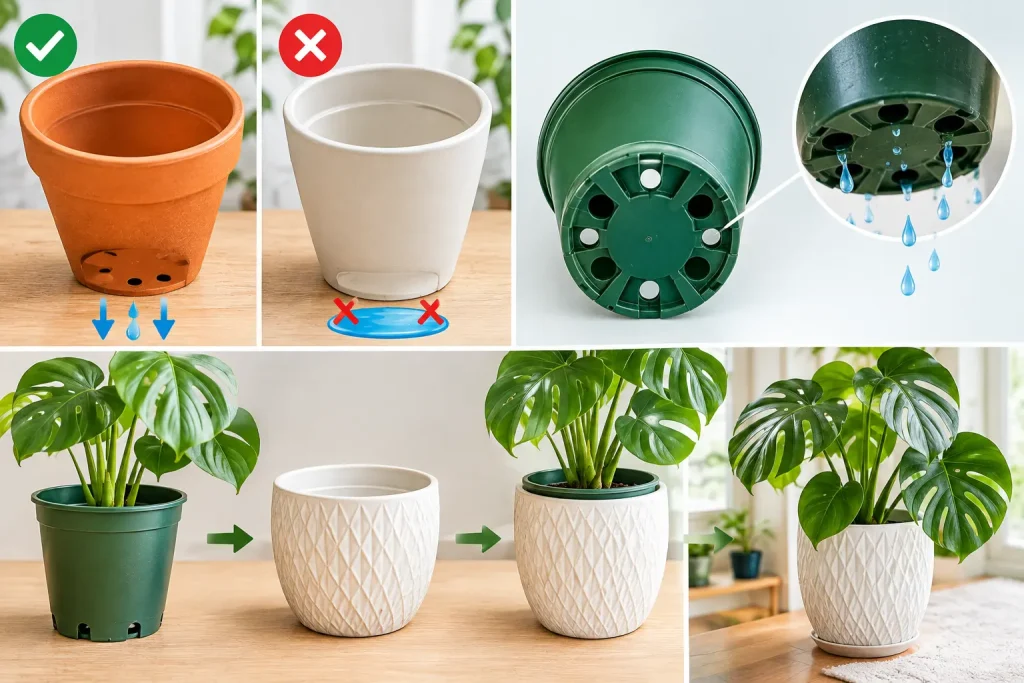
Drainage is always important features of a Monstera pot. Choose the container which has holes at its bottom. This gives extra water a way to leave the pot instead of staying around the roots. Too much water around the roots can increase the chances of roots damage. A pot without holes can still be used as an outer cover. Keep the Monstera in a nursery pot with drainage holes because it is best and place that pot inside the decorative container.
2. Pick the Right Pot Size
A young Monstera does not need a huge or big size container.
For example:
| Current Pot | New Pot Size |
|---|---|
| 4-inch pot | About 6 inches |
| 6-inch pot | About 8 inches |
| 8-inch pot | About 10 inches |
| 10-inch pot | About 12 inches |
These are the best starting points rather than strict rules. Check the root system before moving the plant into a big pot. If roots are coming through the drainage holes the soil dries very quickly or the plant becomes unstable because it has outgrown its container it may be the time to shift the plant to a big pot.
3. Plastic Pots
Plastic pots are light weight, affordable, and easy to move. They also keep moisture longer than other pots. This can be very useful if your home is warm and the potting mix dries very quickly. A plastic nursery pot with drainage holes is a best choice for Monstera Plant.
4. Terracotta Pots
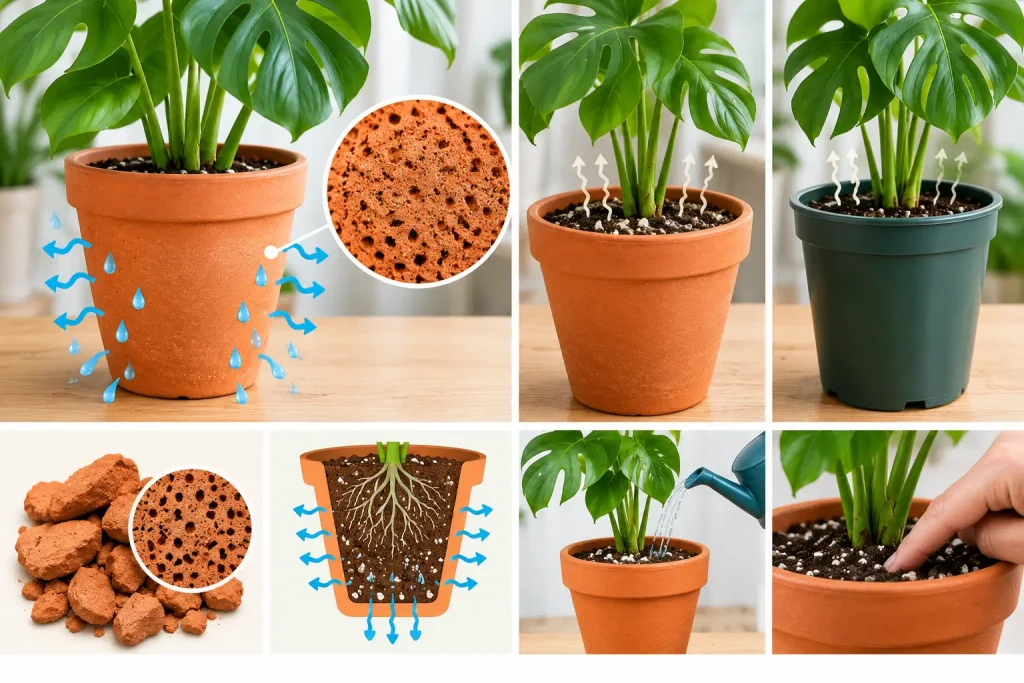
Terracotta is one of types of porous clay. It allows moisture to pass through the sides of the pot because of this the potting mix can dry faster than a plastic container. Penn State Extension notes that unglazed clay pots can reduce waterlogging but plants in them may need watering more often. Terracotta can work well for people who tend to water too often but you still need to check the soil before watering.
5. Ceramic Pots
Ceramic pots are beautiful, look attractive and are available in many sizes. Glazed ceramic pot generally does not lose water through the sides as quickly. A ceramic pot is a best choice for a large Monstera plant when it has a drainage hole.
What is the Best Soil Mix for a Monstera Plant?
Monstera roots need both moisture and air. A wet soil can create a lot of problems. On the other hand a mix that dries out very quickly may also create also a problem like stopping the roots to grow. For an indoor Monstera use a loose houseplant potting mix rather than soil taken straight from the garden. Penn State Extension recommends a good-quality soilless potting mix for indoor containers. Common materials found in these mixes include peat moss, coir, perlite and other ingredients.
A Simple Monstera Soil Mix Recipe
You can make a simple mix at home using:
* 2 parts quality indoor potting mix
* 1 part orchid bark
* 1 part perlite
This gives the roots a mix that can retain some moisture while allowing excess water and air to move through the container.
Another option is:
* 2 parts coco coir or peat-based potting mix
* 1 part perlite
* 1 part orchid bark
The exact recipe does not need to be perfect. What matters is how the finished mix behaves after watering.
It should become moist but should not remain like wet mud for days.
Best Tools for Potting a Monstera Plant
A few basic tools are enough for most Monstera potting jobs.
New Plant Pot
Choose a container that is only a little larger than the current one and has drainage holes.
Gardening Gloves
Gloves can keep your hands clean while handling potting mix and roots.
Clean Pruning Shears
Sharp pruning shears can be used to remove dead or damaged roots when needed.
Small Hand Trowel
A hand trowel makes it easier to move potting mix into the container without making a large mess.
Mixing Container
A clean bucket, bowl, or garden tub can be used to mix the potting ingredients before placing them in the pot.
Watering Can
A watering can with a narrow spout gives you better control when watering around the base of the plant.
Measuring Cup
A measuring cup can help keep your soil recipe consistent.
Moisture Meter
A moisture meter can help beginners check the moisture level inside the pot.
How Often Should You Change the Pot?
There is no single schedule that works for every Monstera.
Check the plant and its roots instead The University of Minnesota Extension says Monstera deliciosa commonly needs repotting every one to two years as it grows with late winter or early spring being a common time for repotting.
Signs that your Monstera may need a larger pot include:
* Roots coming out of the drainage holes
* Soil drying within about a day
* The plant becoming unstable
* A root ball that fills most of the container
* Growth slowing even though the plant receives suitable care
These signs are more useful than following a fixed calendar.
How to Pot a Monstera Plant
Once your pot, soil mix and tools are ready, the process is fairly simple. Follow these steps when repotting your Monstera Plant.
| 01 Step 1 | Prepare the New Pot
|
| 02 Step 2 | Prepare the Soil MixMix your potting ingredients in a clean container. A good starting recipe is:
2 Parts
Indoor potting mix
1 Part
Orchid bark
1 Part
Perlite Mix the ingredients evenly.
Penn State Extension recommends moistening potting mix before
repotting so it can absorb water evenly. |
| 03 Step 3 | Remove the Monstera
|
| 04 Step 4 | Check the RootsHealthy roots are usually firm. Look for roots that are soft, very dark, or have an unpleasant smell. These can be signs of root problems.
If damaged roots are present, use clean pruning shears to
remove the affected parts. |
| 05 Step 5 | Add the Soil MixPlace enough mix in the new container so that the top of the Monstera root ball sits at a suitable height.
Do not bury the main stem much deeper than it was in the previous pot. |
| 06 Step 6 | Place the PlantSet the Monstera in the center of the pot. Check the height before adding more soil. |
| 07 Step 7 | Fill Around the Root Ball
|
| 08 Step 8 | Water Thoroughly
|
How to Know if Your Soil Mix Is Working
Watch the plant and the soil after watering.
A suitable mix should:
* Absorb water without becoming a muddy mass
* Let extra water leave through the drainage holes
* Stay lightly moist for a reasonable period
* Remain loose rather than becoming tightly packed
* Allow air to reach the roots
If water sits on top of the soil for a long time, the mix may be too dense. If the mix becomes completely dry very quickly, you may need a mix that holds more moisture or a container that better matches the plant’s root size.
Pot and Soil Mistakes to Avoid
A few simple mistakes can create problems for Monstera plants.
Using a Pot Without Drainage
This is one of the easiest mistakes to prevent.
Always use a container that allows excess water to escape.
Choosing a Huge Pot
A much larger pot can contain a large amount of unused wet mix.
Move up only when the plant needs more root space.
Using Heavy Garden Soil
Garden soil can become compact inside a container and may not provide the air and drainage a potted Monstera needs.
Watering on a Fixed Schedule
Don’t water the plant on same time. First checks the soil of a pot if it is dried then give water otherwise not.
Leaving Water in the Saucer
After watering allow the pot to drain. If water remains in the saucer empty it rather than allowing the pot to sit in it for a long period.
Best Pot and Soil Setup for a Monstera
| Item | Recommended Choice |
|---|---|
| Pot | Plastic, terracotta, or ceramic |
| Drainage | At least one open drainage hole |
| Pot size | Around 2 inches wider than the current pot |
| Base mix | Quality indoor potting mix |
| Aeration material | Perlite |
| Chunky material | Orchid bark |
| Watering | When the upper soil layer becomes dry |
| Repotting | When roots fill the container or growth space becomes limited |
| Extra tools | Trowel, gloves, clean shears, watering can |
Experts Advice for Choosing a Monstera Pot and Soil Mix
It doesn’t means that the best setup means the expensive things. The set up does not have to be so expensive or difficult. Start with a simple pot which is available and that fits the root system and also has drainage. Use a light indoor potting mix and add materials such as perlite and orchid bark when the mix needs more air space and drainage. A mixture of 2 parts indoor potting mix, 1 part orchid bark and 1 part perlite is a useful or best starting point for indoor Monstera plants. Most problems can be avoided by checking the soil regularly and after some time. Check the upper soil layer by finger touch because it can tells you that the plant needs a water or not. With the right pot, suitable growing mix and a few basic tools caring for the root system becomes much easier and enjoyable.
FAQs
What type of pot is best for a Monstera Plant?
A pot with drainage holes is a good choice for a Monstera Plant. Plastic, terracotta, and ceramic pots can all work when they have proper drainage.
How much bigger should a Monstera pot be?
Choose a new pot that is about 2 inches wider than the current pot. A pot that is much larger can keep unused soil wet for too long.
Is terracotta good for Monstera plants?
Yes. Unglazed terracotta is porous and can allow moisture to pass through the sides of the pot. This can help the soil dry faster, but the plant may need water more often.
What tools do I need to repot a Monstera?
Basic tools include a new pot, gardening gloves, clean pruning shears, a small hand trowel, a mixing container, a watering can, and a measuring cup. A moisture meter is optional.